Friday, May 11, 2012

Glossy Screen Space Reflections

For my Game Architecture final project (@RPI), I worked on a glossy screen space reflection (SSR) tech demo. Specular (mirror like) SSR was originally (to the best of my knowledge) brought up at beyond3d, and Crytek also had a few slides on it in their Secrets of CryENGINE 3 Graphics Technology presentation.


Implementation Details

  1. SSR image pass
    1. Pretty standard, except randomly jitter the reflection ray according to roughness
    2. I weighted every direction equally, but you can definitely weight it according to some direction generation probability density (and generate reflection directions accordingly)
  2. Blur pass
    1. Splat the reflection samples in world space based on reflection distance
      1. Convert the world space splat to screen space splat based on distance from eye to surface
    2. Can't splat (scatter) that well, so gather (essentially a bilateral blur)
    3. Weight each nearby sample by 
      1. Reflection distance (we want to blur more the longer the reflection is)
      2. Reflection distance similarity
      3. Depth similarity
      4. Normal similarity
    4. Apply Fresnel incidence effects

Notes

  • The standard issue with SSR not having enough information is present. 
  • Running on a 5850 (very unoptimized)
    • Timing information on the bottom left

Thursday, May 10, 2012

Bidirectional PT, Part 4

During the past few days I implemented specular support in the uniformly weighted BDPT. The key (or obvious) insight is that you're weighting a particular path against the alternatives of doing that particular path, and not against paths of equivalent length. Essentially, one must keep track of what the current combined path has (# of specular/not generatable edges) and weight based on that.


Renders

Note that the caustic looks weird because I disabled shading normals.
BDPT 6 bounces

MIS Ref 6 bounces
Maxwell Ref (mainly for comparing gradients)


Debugging

I found that using 'posterize' is a great way to compare images as it lets you easily visualize intensity differences, gradient differences, and image variance.

BDPT - For Debugging

Ref - For Debugging

Implementation

In my implementation, I have the following logic (please note that in my BDPT the eye vertex and the direction of the 1st eye path edge is fixed). The constants were derived on paper, through trial and error.

int epVariableNonSpecularEdges = 0;
//eye path vertices
for(int epvIdx = 0; epvIdx < numEPV; epvIdx++)
{
     if(epvIdx > 0 && !epVerts[epvIdx - 1].isDelta()) epVariableNonSpecularEdges++;

     //add contribution from the eye path randomly hitting the light
     output += 1.f / (epVariableNonSpecularEdges + 1) * random hit contribution

     //add contribution from direct lighting
     output += 1.f / (epVariableNonSpecularEdges + 2) * direct lighting contribution

     int lpVariableNonSpecularEdges = 0;

     //light path vertices - ignore vertex on the light
     for(int lpvIdx = 1; lpvIdx < numLPV; lpvIdx++) 
     {
           if(lv.isDelta()) continue;
           if(!lpVerts[lpvIdx-1].isDelta()) lpVariableNonSpecularEdges++;
           //add contribution from connecting eye-light path
           output += 1.f/(lpVariableNonSpecularEdges + epVariableNonSpecularEdges + 2) * connection contribution
     }
}

Monday, May 7, 2012

Bidirectional PT, Part 3

Today I finally got the uniform bidirectional traced images to match my reference renders exactly. It took quite a bit of time, as I spent a lot of effort verifying that everything matched the reference renders. Also, a bug in the 'create light path' code took a lot of time to debug. In the end, I just rewrote it and voila!, the images match.

In retrospect, spending that much time debugging the light path code was probably beneficial. I read and reread Veach's thesis, making sure that I understood everything (if it worked perfectly the first time I would've probably just skimmed it).

Renders

For testing purposes, I chose an indirectly lit scene with a lot of occlusion.
BDPT - 6 bounces

References


To do

I'm going to start working on the multiple importance sampling aspect and add specular support.

Sunday, May 6, 2012

Bidirectional PT Experiments, Pt. 2

After working on uniformly weighted Bidirectional PT for a while, the render path seems to be in a pretty good state. The BDPT renders almost matches the reference renders exactly. However, it's still off in places.

While the direct lighting and the first bounce matches exactly, from bounce 2 onward the indirect lighting in the BDPT seems weaker than the reference. I'm not quite sure why this is happening. It could be that there's some hidden intersection testing issues, the weights aren't being updated properly, the eye-light path connection isn't working (seems unlikely though, as the 1st bounce matches perfectly), etc

Renders

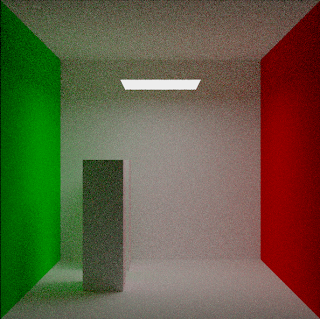
BDPT - 6 bounces (I think the fireflies are caused by extremely short eye-light connections, as the eye-light transfer has a 1/d^2)
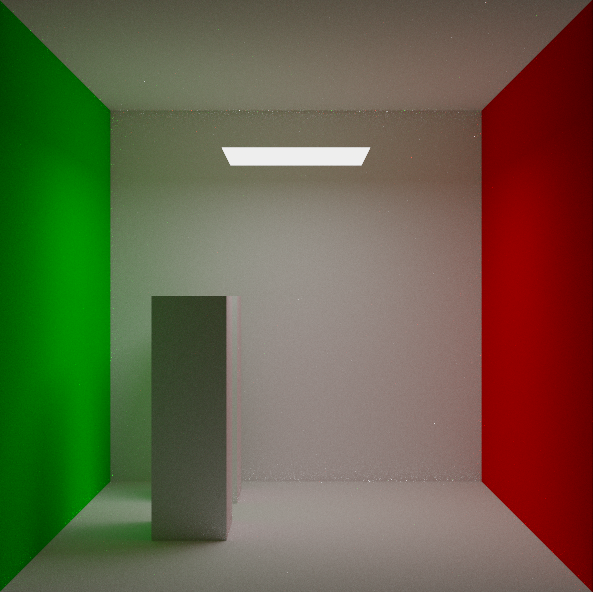
 Unidirectional + MIS Reference - 6 bounces
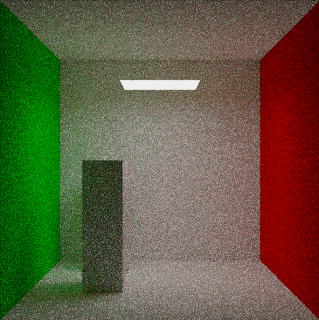
BDPT - 5 second render - 6 bounces

MIS Unidirectional Ref - 5 second render - 6 bounces
From the above comparison, BDPT with uniform weighting is actually not that great. I will be implementing MIS BDPT next.

Validation

For validation, I checked each BDPT bounce with reference version. In addition, I set Russian Roulette on BDPT and Ref, and compared the 'infinite' bounce renders. As noted above, while direct and bounce 1 matches, the other bounces do not (slightly). 

Note

In a BDPT, because you have two paths (eye and light), the highest partially accounted bounce is actually EP + LP deep. Note that it's "partially". For example, lets say we have 8 eye  and 8 light bounces, for a max of 16 bounces. The BDPT will weight the 16 bounce solution assuming you have (15E 1L, 14E 2L, etc...), despite the 8 E 8L cap. So for validation purposes I had to throw out a lot of combinations; otherwise the image has incomplete bounces.

Implementation Notes

Light Eye Path Connection

I used the projected solid angle (cos*cos/d^2) of the light vertex w.r.t. the eye vertex to transfer the weights.

Uniform Weights

I ignored the 'light path hits the camera' and the 'construct shadow ray from camera to light vertex' cases. So, for a length 2 path, the weight is 1/2.

Extra 'eye path accidently hits light' bounce. 

I have an extra bounce where I detect if my eye path accidently hits the light, and adds it to the color. Only this case is handled in this extra bounce (ignore any paths involving shadow rays). 


Friday, May 4, 2012

Embree as an Intersection Library

Today I switched the intersection code to use Embree's BVH intersection system. I was tired of constantly not knowing whether it was my spatial acceleration structure not working, or my path tracing not working. I felt that using an external intersection system temporarily as a reference would be beneficial.

I looked at several choices in addition to Embree, such as Caustic Graphics' OpenRL and some open source projects on Google Code. OpenRL's designed more as a framework than a library, with a heavy and verbose OpenGL style API and 'raytracing shaders'. I decided that OpenRL wasn't worth the trouble, and checked out Embree's code. It was exceptionally well laid out, and honestly one of the best pure 'libraries' in the games/graphics scene (a lot of libraries want to take over every aspect of your code).

tl;dr, if you're looking for an easy to integrate and performant triangle - ray intersection library, look no further than Embree.

Note: Embree needs to be initalized before its intersection modules (rtcore/common) can be used! Initialize Embree by calling embree::TaskScheduler::init().

Bidirectional Path Tracing Experiments

I finished a preliminary implementation of bidirectional path tracing with naive (aka uniform) weighting today. (MIS Bidirectional to be done later... after I can confirm the naive version works). Although the images look quite close to the 'reference' renders (unidirectional), they're still either brighter or darker. I'm frankly not sure if my reference renders are even correct now.

One thing I did notice is that my bidirectional renders have either less or more indirect light than the reference ones. I have confirmed that my direct lighting (eye - vertex - light) matches, so I'll probably single out the indirect and look at the differences.


Bidirection PT with light pointing down
Reference with light pointing down
Reference with light pointing up
Bidirection PT with light pointing up
Also of note is that the Veach paper mentions that there are k+2 'paths' for a given 'path length', where path length is # eye verts + # light verts + 1. (Note that the points on the lens/light surface count as verts). I'm not quite sure if this is correct, but since my lens - eye vert 1 path is fixed, I think I only have k+1 possible paths.

Another thing I'm uncertain about is whether I'm suppose to divide my light throughput by the uniform hemispheric sampling PDF (1/pi).

Thursday, May 3, 2012

Multiple Importance Sampling

Today I finally got a verifably correct implementation of direct lighting MIS. Here're two comparison images, each at 5spp. There's a large area light, and the surface is glossy Phong with a 100000 exponent (very hard for light sampling)

MIS (5 spp)
No MIS (5 spp)
My original MIS implementation randomly selected either light sampling or brdf sampling. While it kind of worked, it did introduce a lot more variance into the image. The current MIS implementation reuses the surface's indirect brdf sample as the light's brdf sample.

And here's a render of the Cornell box.
Glossy Cornell box (800 spp)
Reference rendered in Maxwell